-
User Information
You can make modifications to the accounts added to your panel through this page.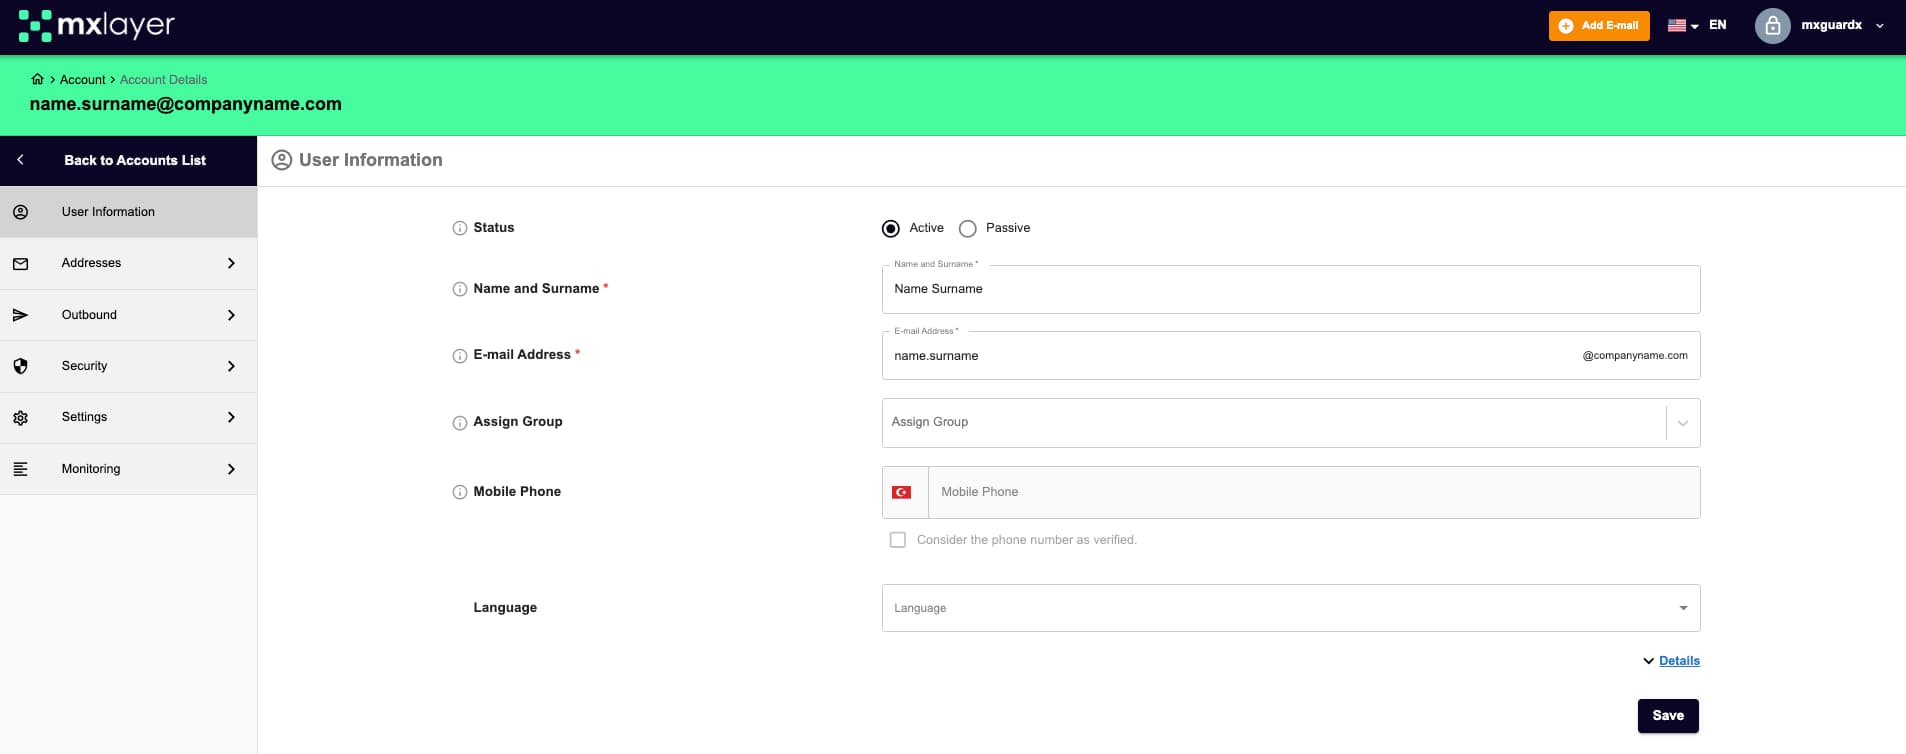
-
Addresses
You can view and edit the internal forwarding of the account through this page .
- Aliases are alternative addresses assigned to an email address.. Emails sent to these addresses are forwarded to the original email address. An address designated as internal forwarding does not have a mailbox.

- To delete the internal forwarding you added, click the “Delete” button in the actions column.

-
Outbound
You can view and edit the Limit, Control, and IP Address for Sending information of the account through this page.
- In the Limit section, you can change your hourly, daily, and monthly sending limits. From the detailed transaction option, your internal communication sending limits are unlimited, and you can set your sending limits for external communication. If there is no value in the relevant section, the system’s default settings allow 100 sends per hour, 1000 per day, and 10000 per month. If these sending rates are not sufficient, please consult your administrator.
- In the Control section, you can adjust the sending permissions of the relevant account.

- From the “Stop Sending E-mail” section, you can stop the account from sending emails or reactivate the sending process.
- In the IP Address for Sending section, enter the relevant IP address and then click the “Save” button to complete the process.

Note: If you encounter any problems during the IP address assignment process or if the IP address is not defined, please consult your administrator.
-
Security
You can edit the account’s Access Services, Trusted Senders, Trusted Recipients, Blocked Senders, Blocked Recipients, Sending Time, and Active Sessions information through this page .
- Access Services: In this section, you can configure the permissions of the protocols in the relevant account and determine which IP addresses can connect by defining the IP addresses in the IP Addresses section.

- Trusted Sender List: The email addresses, domain names, or IP addresses added to this section will be delivered to you without any issues through the system. You can add trusted senders by writing the email address, domain name, or IP address. You can also perform bulk additions using the Bulk Add button. To delete a trusted sender, find the record through the search section and click the “Delete” option in the Actions column.

- Trusted Recipient List: The domain names, email addresses, or IP addresses added to this section will be delivered to you without any issues through the system. You can add trusted recipients by writing the email address, domain name, or IP address. You can also perform bulk additions using the Bulk Add button. To delete a trusted recipient, find the record through the search section and click the “Delete” option in the Actions column.

- Blocked Senders: By adding an email address, domain name, or IP address to this section, you can ensure that emails from the relevant email address, domain name, or IP address are rejected without being subjected to filter control. To delete a blocked sender, find the record through the search section and click the “Delete” option in the Actions column.

- Blocked Recipients: By adding an email address, domain name, or IP address to this section, you can control the emails sent to the relevant email address, domain name, or IP address. To delete a blocked recipient, find the record through the search section and click the “Delete” option in the Actions column.
 NOTE: To perform a bulk add in these lists, first click the “Add Bulk” option. Then, in the text field that appears, enter one email address, domain name, or IP address per line. This way, you can complete the bulk add process by ensuring there is only one item per line.
- Sending From: This section allows you to adjust the sending permissions for emails sent through third-party applications and the message center, according to the sending permissions provided.

- Active Sessions: In this section, you can view the devices connected to the relevant account and terminate the session on the devices.
- Browser: You can view the operating system and browser information of the device connected to the account by hovering over the icons.
- Active Device ID and Active Device Name: Displays the system ID and browser information of the connecting device.
- Location/IP Address: Shows the IP address of the connection.
- Login Date: Shows the first connection date made from the relevant device.
- Last Used Date: Shows the last connection information made from the relevant device.
- Actions: Click the “Delete” button in the Actions column to terminate the device’s connection.

- Verification Devices: This section allows you to manage the verification methods used to securely access your account. The verification devices registered on this page add an extra layer of security to your account and prevent unauthorized access.
-
Settings
You can edit the account’s information about Quarantine, Portal, Add-ons, Signature, Disclaimer, Custom Apps through this page.
- In the Quarantine section, you can define the quarantine notification settings for the account.
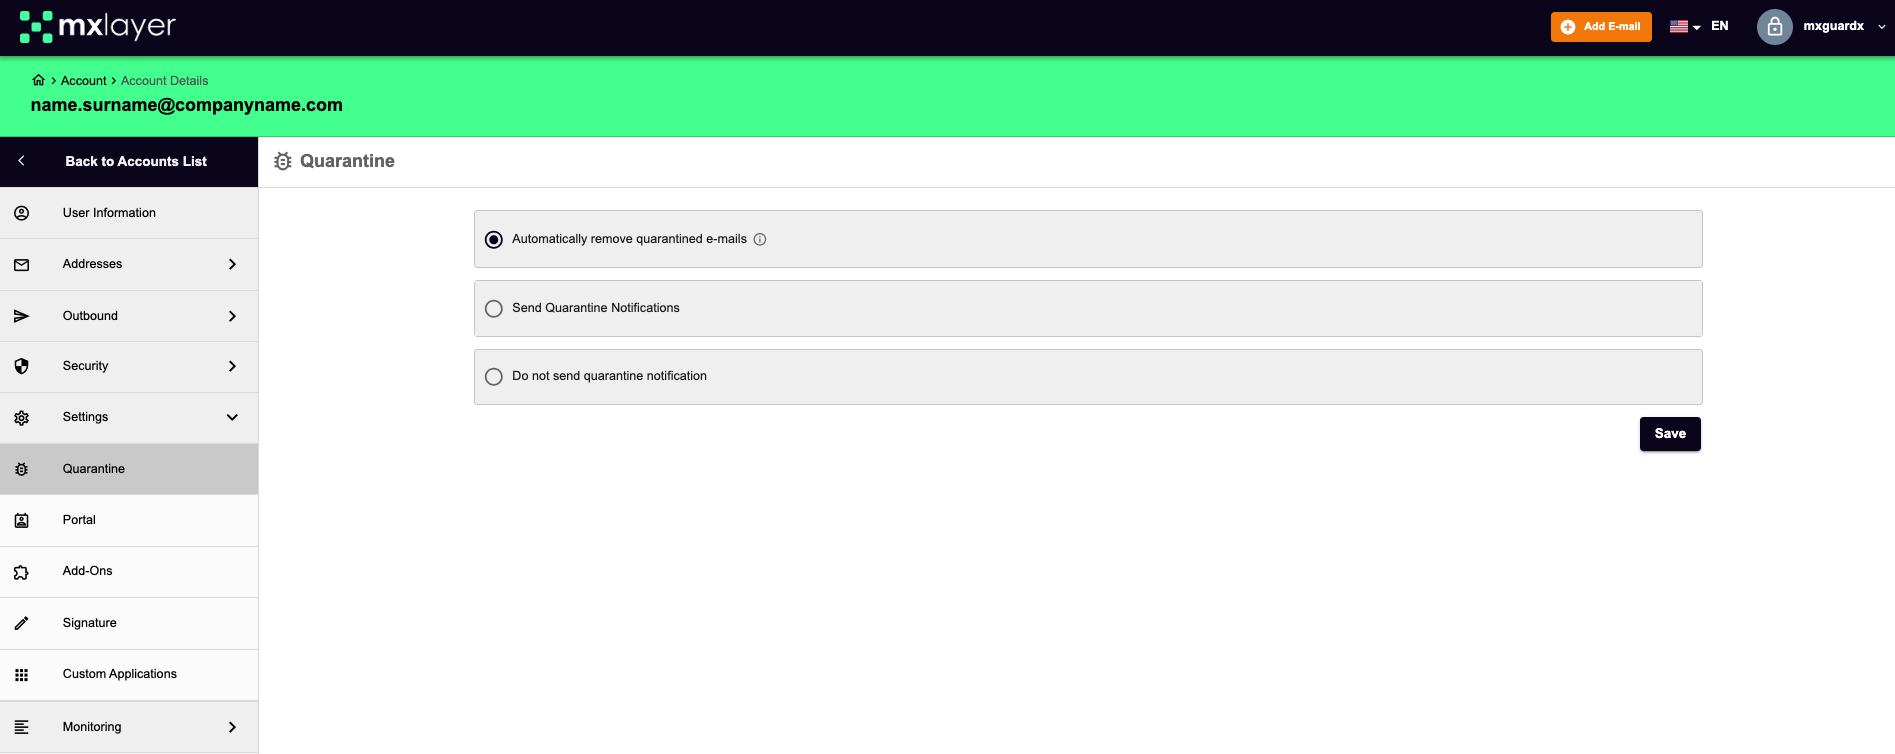
- Automatically Remove Quarantined Emails:
When this option is selected, emails quarantined, except for those affected by Antivirus and URL checks, will be automatically removed and delivered to the recipient’s inbox.
- Send Quarantine Notification:
By selecting this option, you can activate the sending of quarantine notification emails.
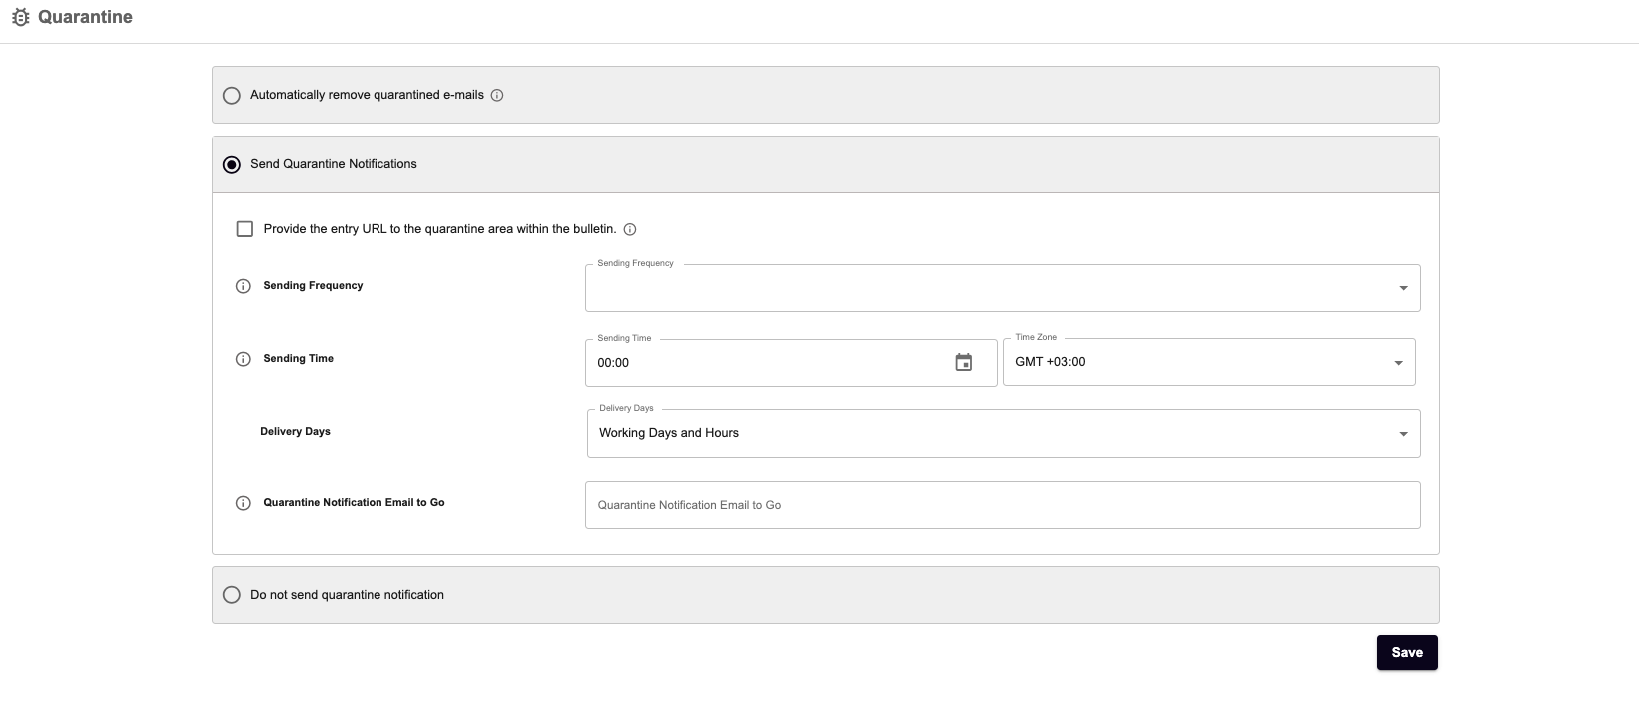
– Include Quarantine Access URL in the Bulletin:
When this option is selected, a quarantine access link allowing the user to enter the quarantine area without a password will be included in the bulletin email.
– Sending Frequency:
You can determine the sending frequency of the notification email to the user as long as there are emails in quarantine from this section.
– Sending Time and Time Zone:
You can set the time for the quarantine notification email to be sent according to the desired time zone in this section.
– Sending Days:
You can define the days and times for the quarantine notification emails in this section.
– Quarantine Notification Email:
You can use this section to send quarantine notifications to an address other than the user’s address. If no email is specified, notifications will be sent to the user’s email address.
- Disable Quarantine Notification:
If you have previously set up quarantine settings and do not wish to receive these notifications, you can turn off the relevant setting using this option.
- In the Portal section, you can set the Message Center permissions for the account.
 With this option, you can activate or deactivate transition buttons like quarantine use and statistics use after entering the message center.
- In the Add-Ons page, you can determine which services and features the account will use. To assign settings to an account, the relevant settings must first be enabled on the Add-Ons page in the domain list. If the relevant services and features are not active, please contact your administrator.
 Then, edit the account to be assigned features and make the necessary definitions under the Add-Ons menu.
- In the Disclaimer section, you can define a Disclaimer text for active accounts. You can add the disclaimer in two different formats: text and HTML.
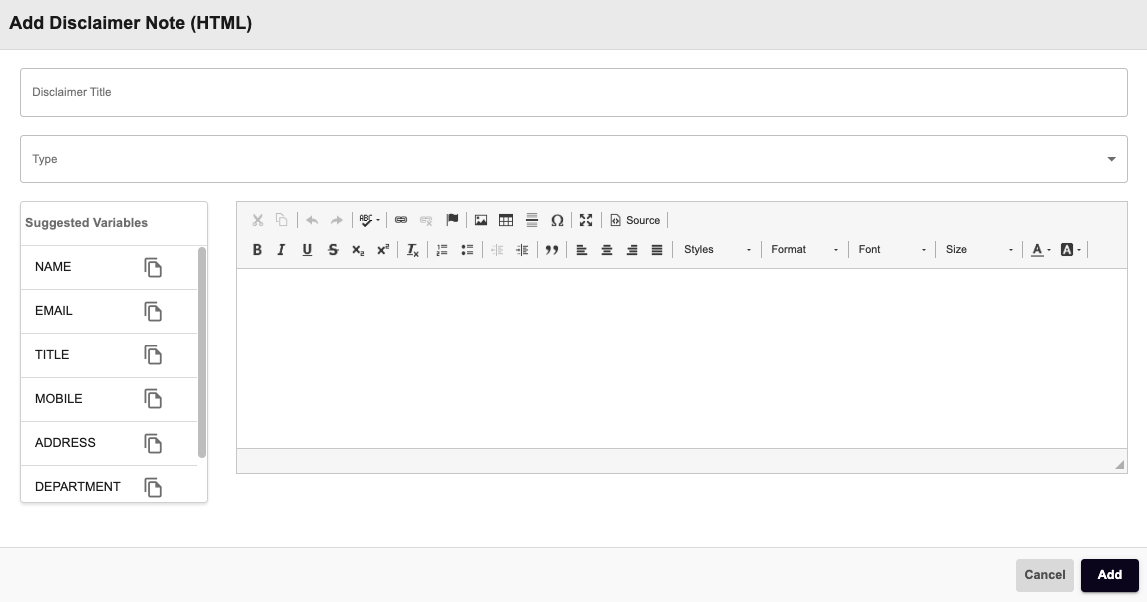 To add a disclaimer, follow these steps:
- Select the format you want to add and click the “Add” button.
- On the screen that appears, write the title of the disclaimer in the “Disclaimer Title” section.
- From the “Type” section, determine whether the disclaimer will be used in internal or external correspondence.
- Add the disclaimer content you have prepared into the “Body” section.
- Click the preview button to preview the disclaimer you have added.
- Click the “Add” button to complete the process.
If you want your disclaimer to be automatically filled in with user information, follow these steps:
- Select the format you want to add and click the “Add” button.
- On the screen that appears, write the title of the disclaimer in the “Disclaimer Title” section.
- From the “Type” section, determine whether the disclaimer will be used in internal or external correspondence.
- Add the disclaimer content you have prepared into the “Body” section.
- The information specific to users, called Variables, will be automatically filled in according to the information in the account details section:
– NAME: Inserts the data written in the “Name and Surname” section of the active account into the disclaimer.
– EMAIL: Inserts the data written in the “Email Address” section of the active account into the disclaimer.
– TITLE: Inserts the data written in the “Title” section of the active account into the disclaimer.
– MOBILE: Inserts the data written in the “Mobile Phone” section of the active account into the disclaimer.
– ADDRESS: Inserts the data written in the “Work Address” section of the active account into the disclaimer.
– DEPARTMENT: Inserts the data written in the “Department Name” section of the active account into the disclaimer.
– PHONE: Inserts the data written in the “Desk Phone” section of the active account into the disclaimer.
To make the added disclaimers effective in your correspondence, click the “Set as Default” button in the “Disclaimers” section.

To update the disclaimers you have added, click the “Edit” button in the “Disclaimers” section, and to delete them, click the “Delete” button.
- Click the “Add” button on the custom application page.
- On the custom application add screen that appears, enter the name of your application in the “Application Name” section.
- In the “Icon URL” section, enter the URL of the icon you want to add in HTTPS format.
- Enter the URL of your application in the URL section. Click the add button to complete the process.
- In the Custom Applications section, you can customize the shortcut icons that will appear on the message center for the account. You can easily reach the relevant pages by clicking the icons you will add.
To add a custom application, follow these steps:
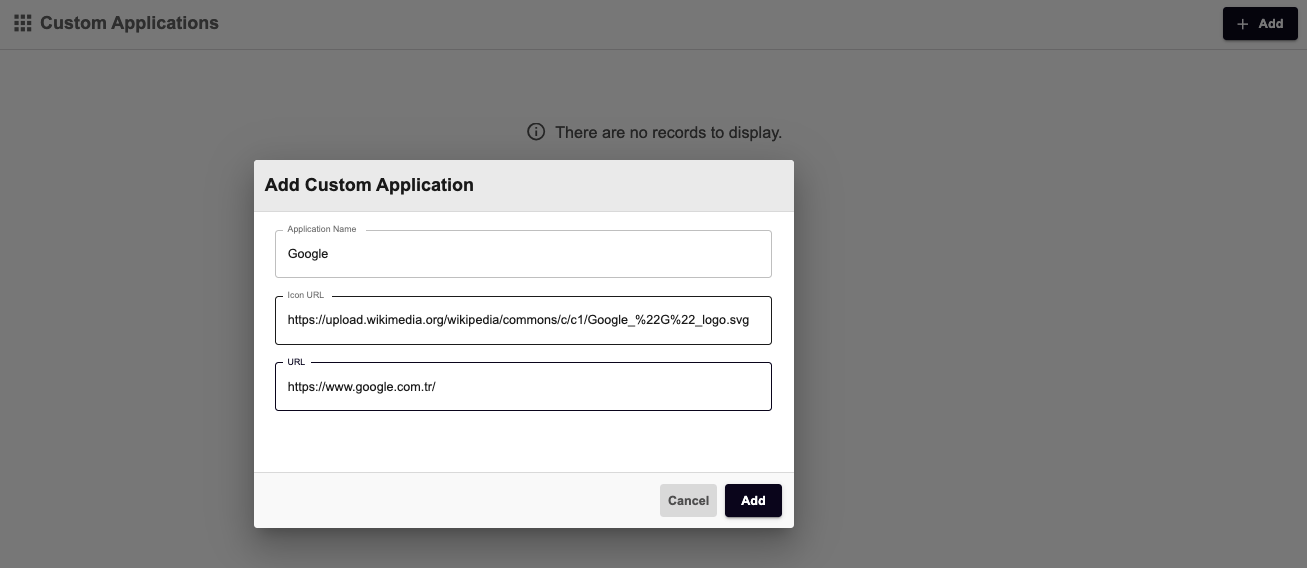
- Click the “Add” button on the custom application page.
- On the custom application add screen that appears, enter the name of your application in the “Application Name” section.
- In the “Icon URL” section, enter the URL of the icon you want to add in HTTPS format.
- Enter the URL of your application in the URL section. Click the add button to complete the process.
-
Monitoring
You can view the statistics, log, and quarantine information for the account through this page.
- In the Statistics section, you can view statistics related to your incoming and outgoing emails.
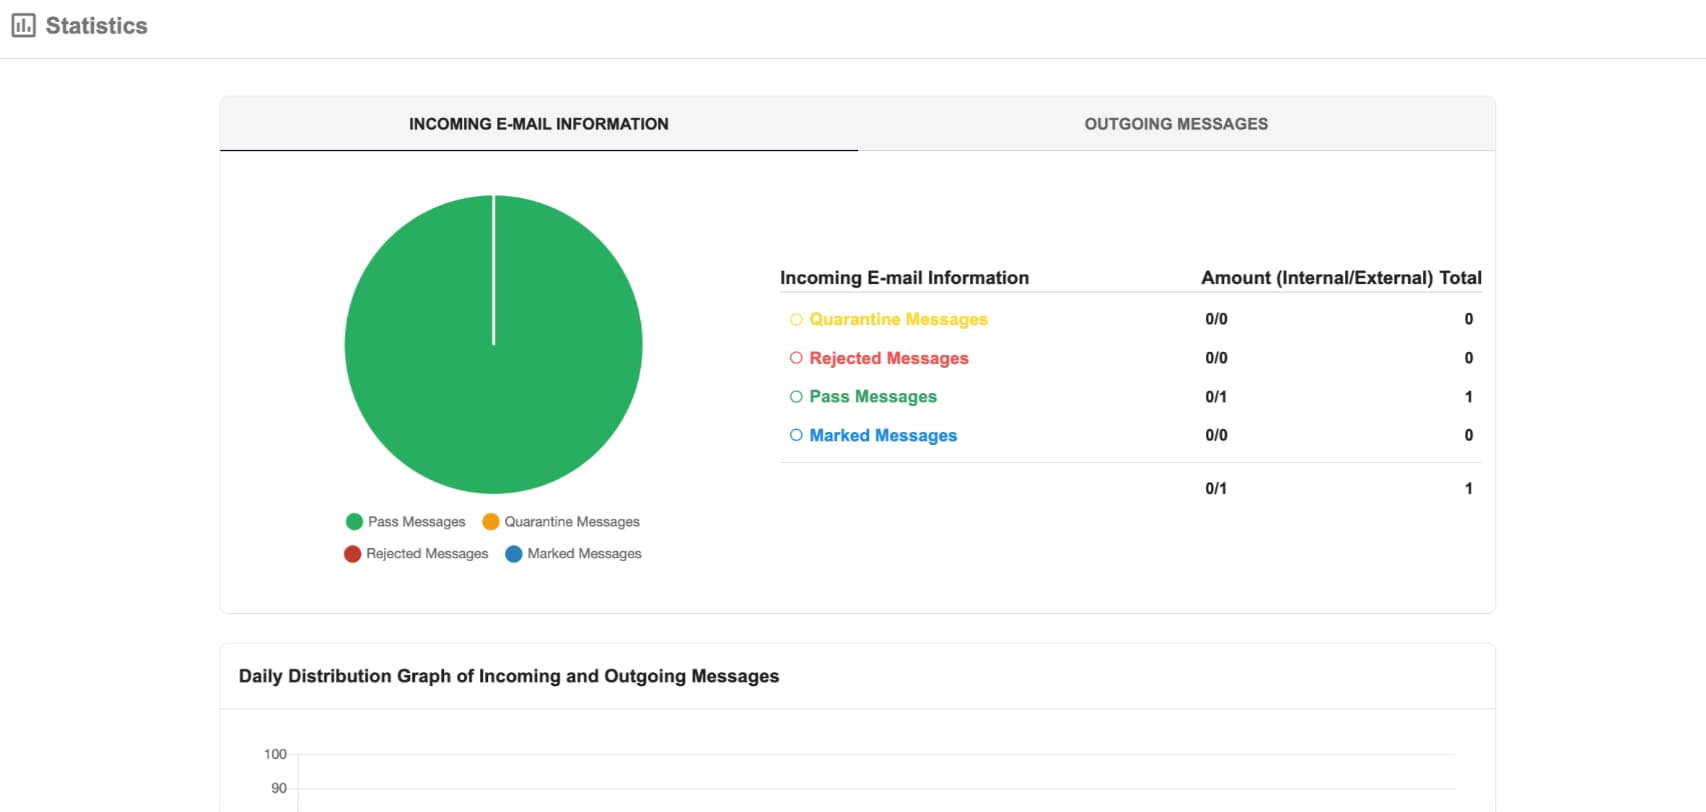
- In the Incoming Messages Information section, you can view the number of emails received.
-
- In the Quarantined Messages section, you can view the number of messages held in quarantine.
- In the Rejected Messages section, you can view the number of messages sent to you but not accepted for certain reasons.
- In the Passed Messages section, you can see the number of messages that have reached you without any issues.
- In the Marked Messages section, you can view the number of messages marked due to a special filter rule applied on the panel.
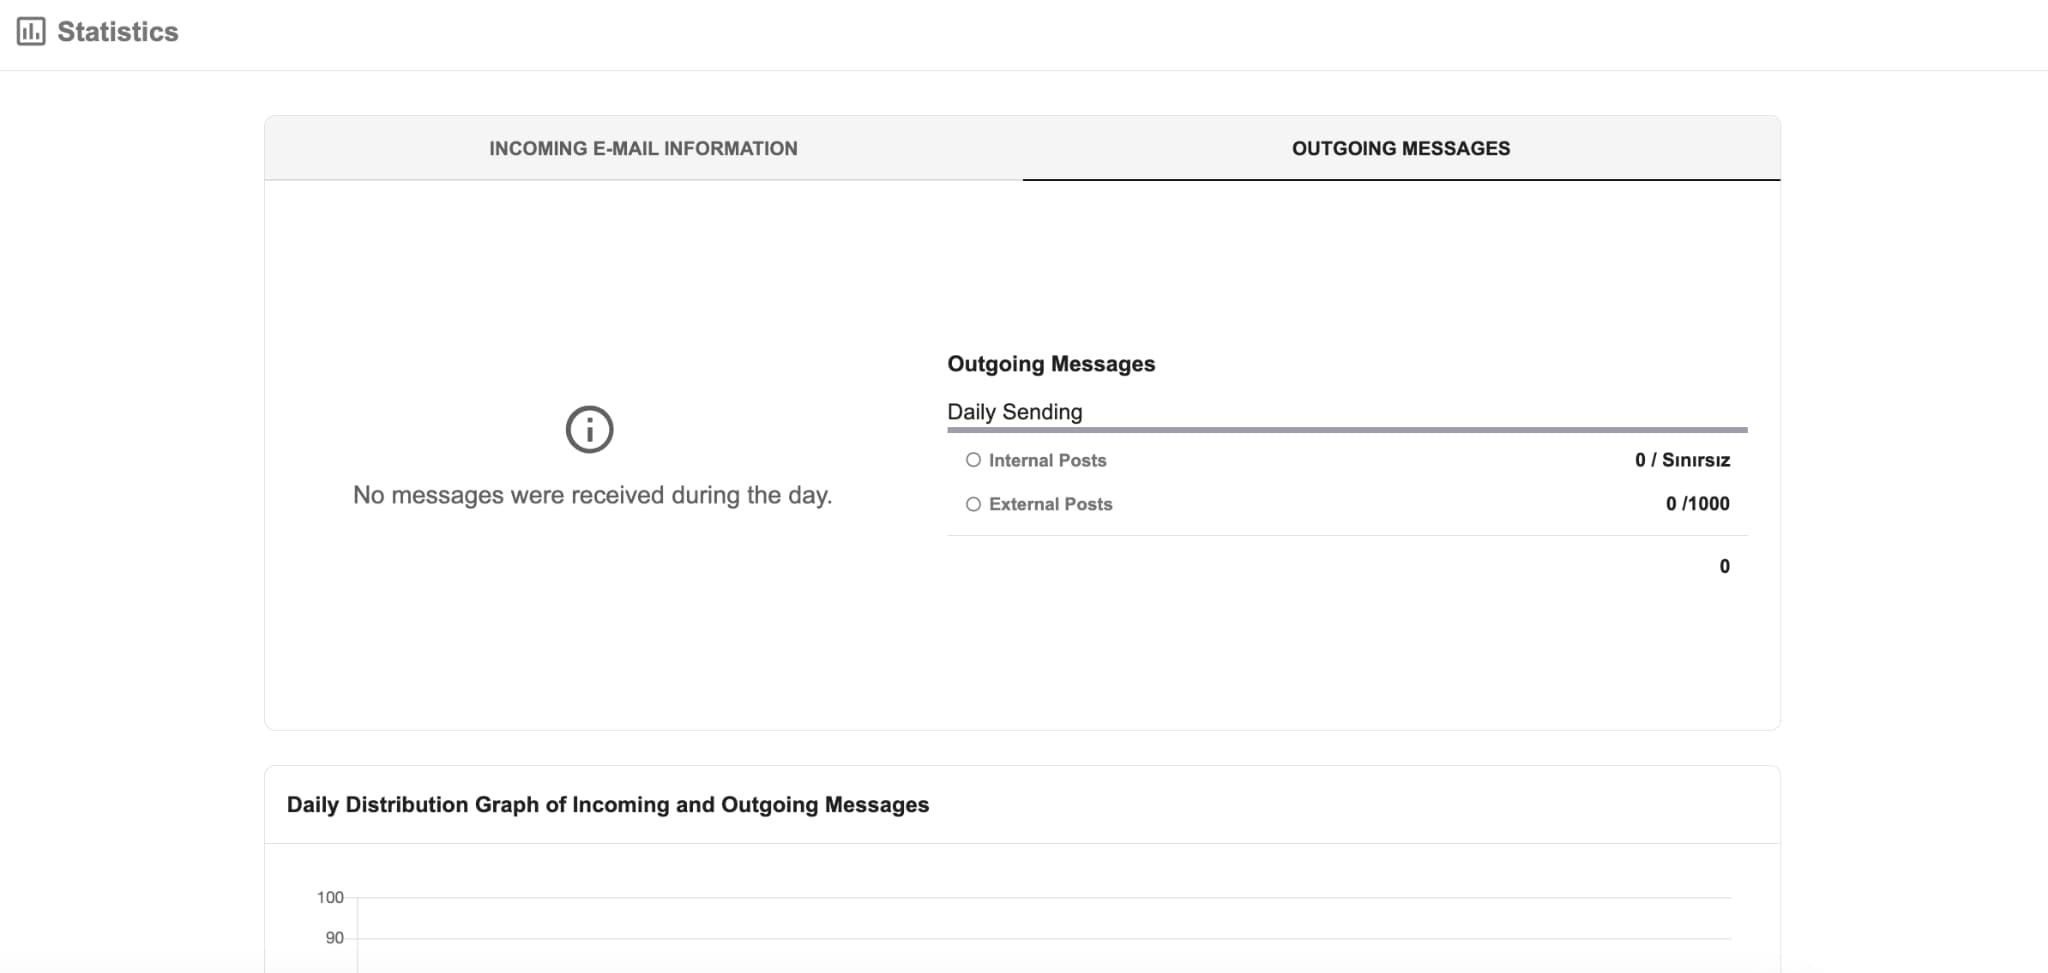
- In the Outgoing Messages Information section, you can view the number of emails sent by you.
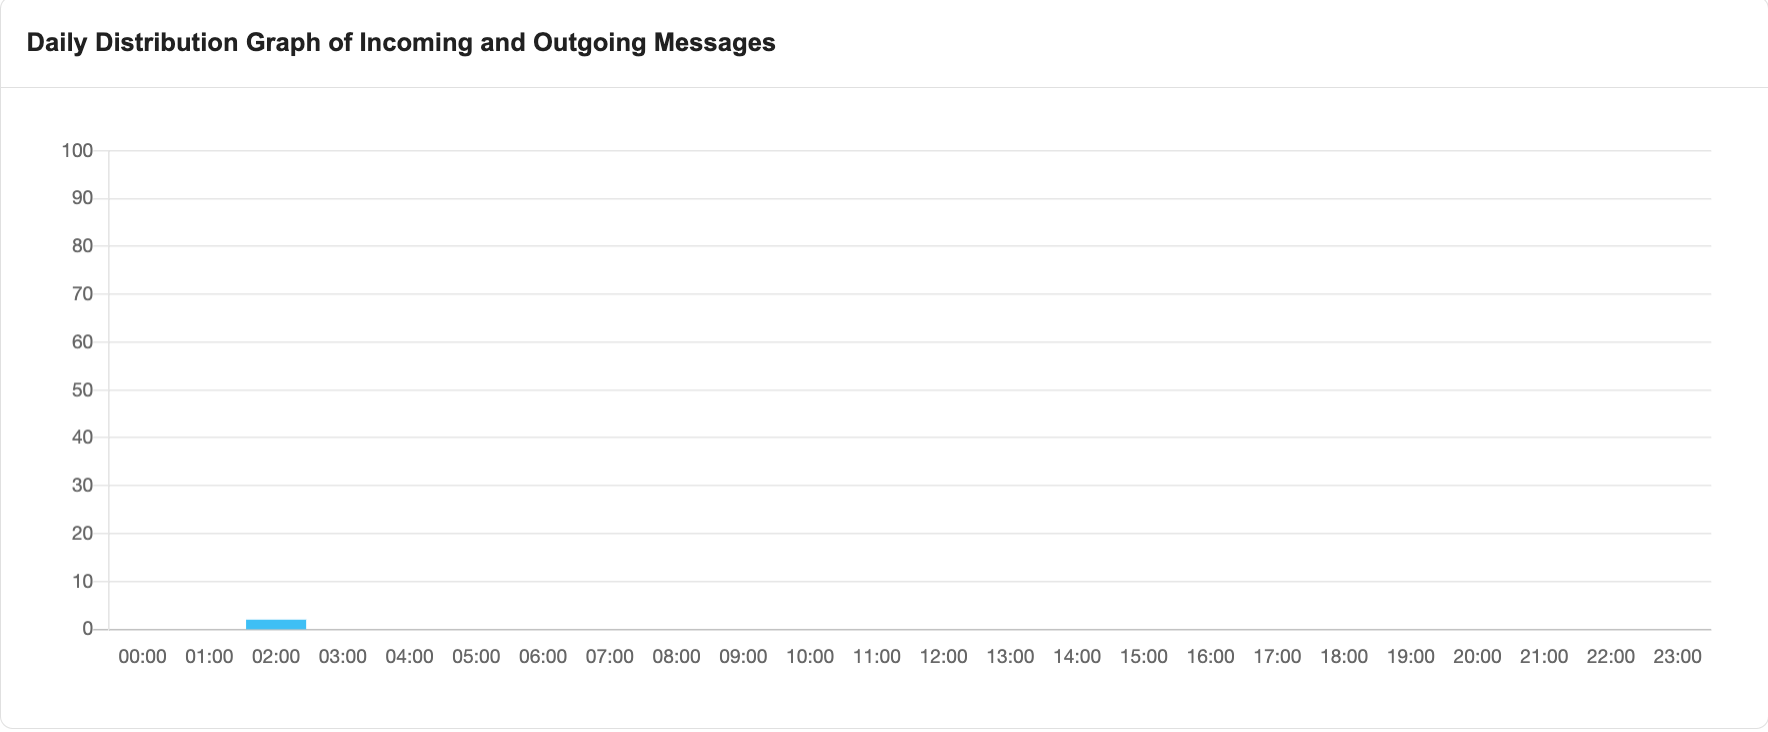
From the Daily Sending section, you can view the number of emails sent daily. - In the Daily Distribution Graph of Incoming and Outgoing Messages section, you can view the hourly distribution of incoming, outgoing, quarantined, and rejected emails.
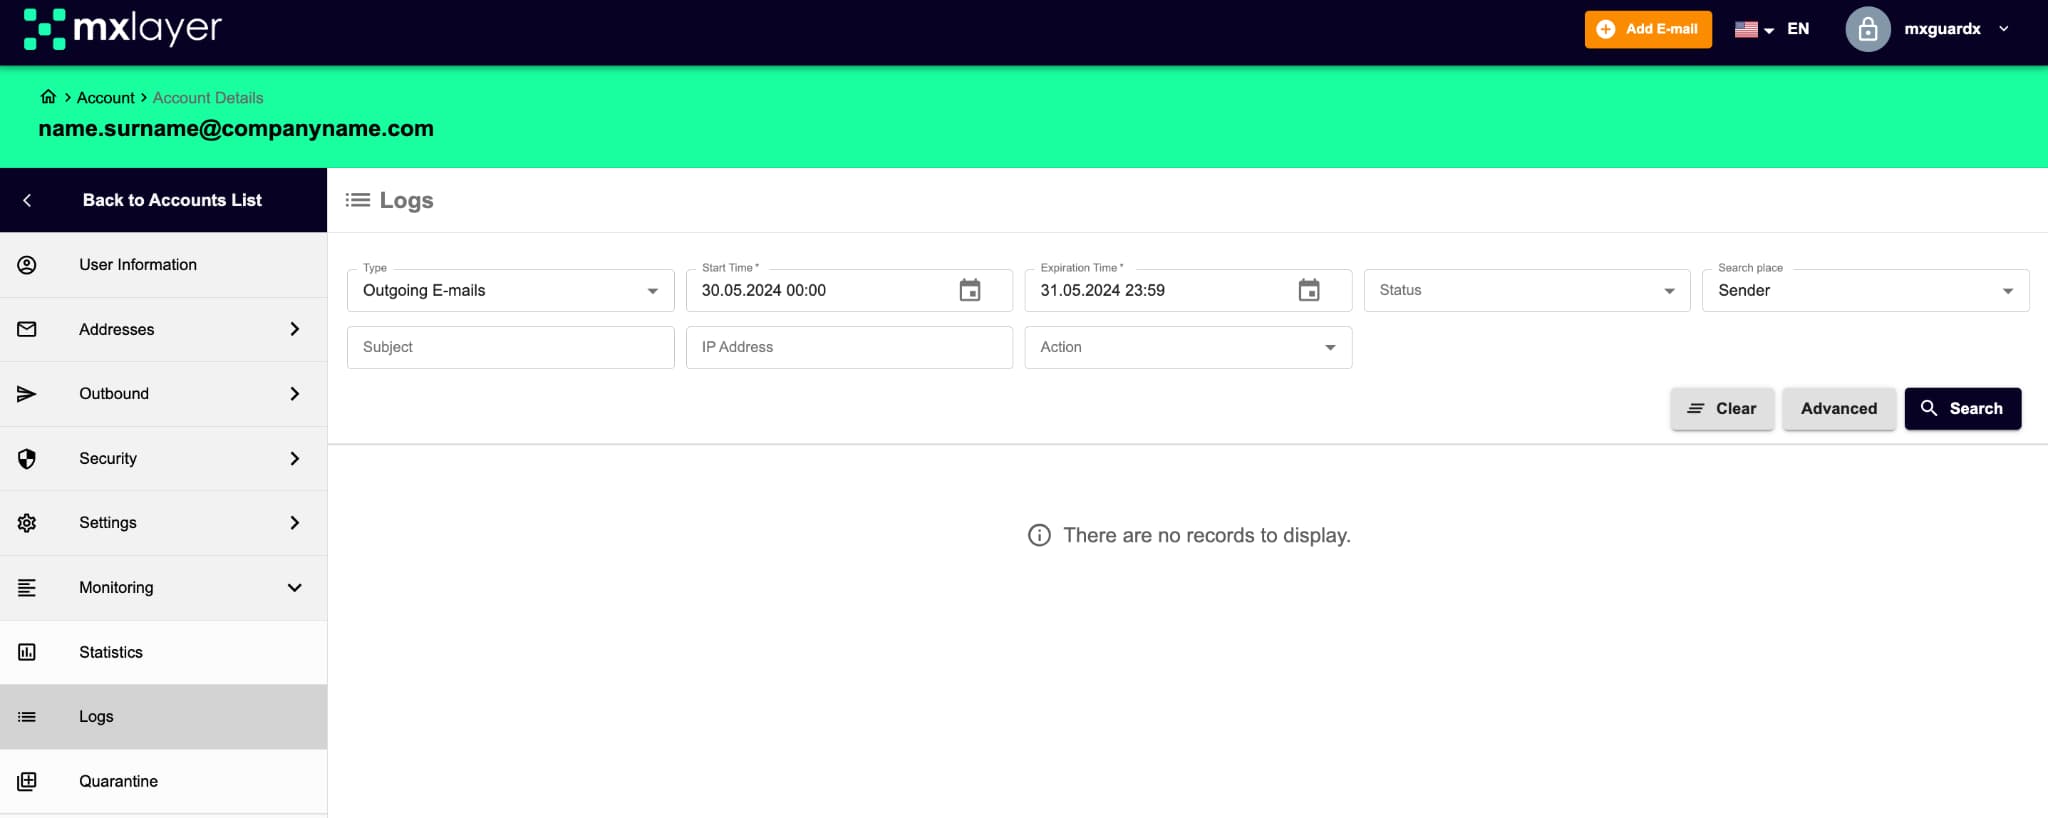
- In the Log section, you can access the details of emails sent to your addresses or from your addresses. Note: The system only keeps a log record for 15 days.
- From the Type section, select Incoming Emails to search the log records of emails sent to your account. Select Outgoing Emails to search the log records of emails sent from your account based on time zones. With the Authentication option, you can access the details of the connections made by active accounts.
- You can determine the start and end dates of the log records you want to list from the relevant sections.
- From the Status section, you can view the reason for the applied action:
-
- Antivirus: The incoming email is held in quarantine due to harmful content.
- Antispam: The incoming email is held in quarantine due to the antispam filter.
- Filter: The incoming email is held in quarantine due to a custom filter.
- BCC: When a copy of an email is directed to another account, it can be searched more easily in the log.
- Hold: The incoming email is held in quarantine due to a filter defined in the system.
- Blocked List: The incoming email is rejected by the server due to the sender address, domain, or IP address being added to the blocked list.
- Distribution List: The incoming email is taken to the pending queue section and can be searched according to the distribution list status in the log due to the active hold feature.
- SPF: The incoming email is held in quarantine due to the SPF record.
- RBL: The incoming email is held in quarantine due to real-time blacklists.
- URL: The incoming email is held in quarantine due to a link contained in the content.
- Trusted Sender: The incoming email is accepted due to being on the white list.
- From the Search Area section, you can select either the Recipient or Sender part to search.
- You can write the subject of the email you want to list in the log records in the Subject section (you can also perform a search by writing a few words contained in the subject heading).
- From the IP Address section, you can search for the sender’s IP address for incoming emails and the sending IP address for outgoing emails.
- From the Action section, you can search based on the status of the incoming emails:
-
- No Issues: Searches the log records of emails that have reached you without any problems.
- Quarantine: Searches the log records of quarantined emails.
- Rejected: Searches the log records of rejected emails.
- Temporary Error: Searches the log records of emails that encountered a temporary error.
- Deleted: Searches the log records of emails deleted due to special filters.
- Hold: Searches the log records of emails held due to a filter or distribution list.
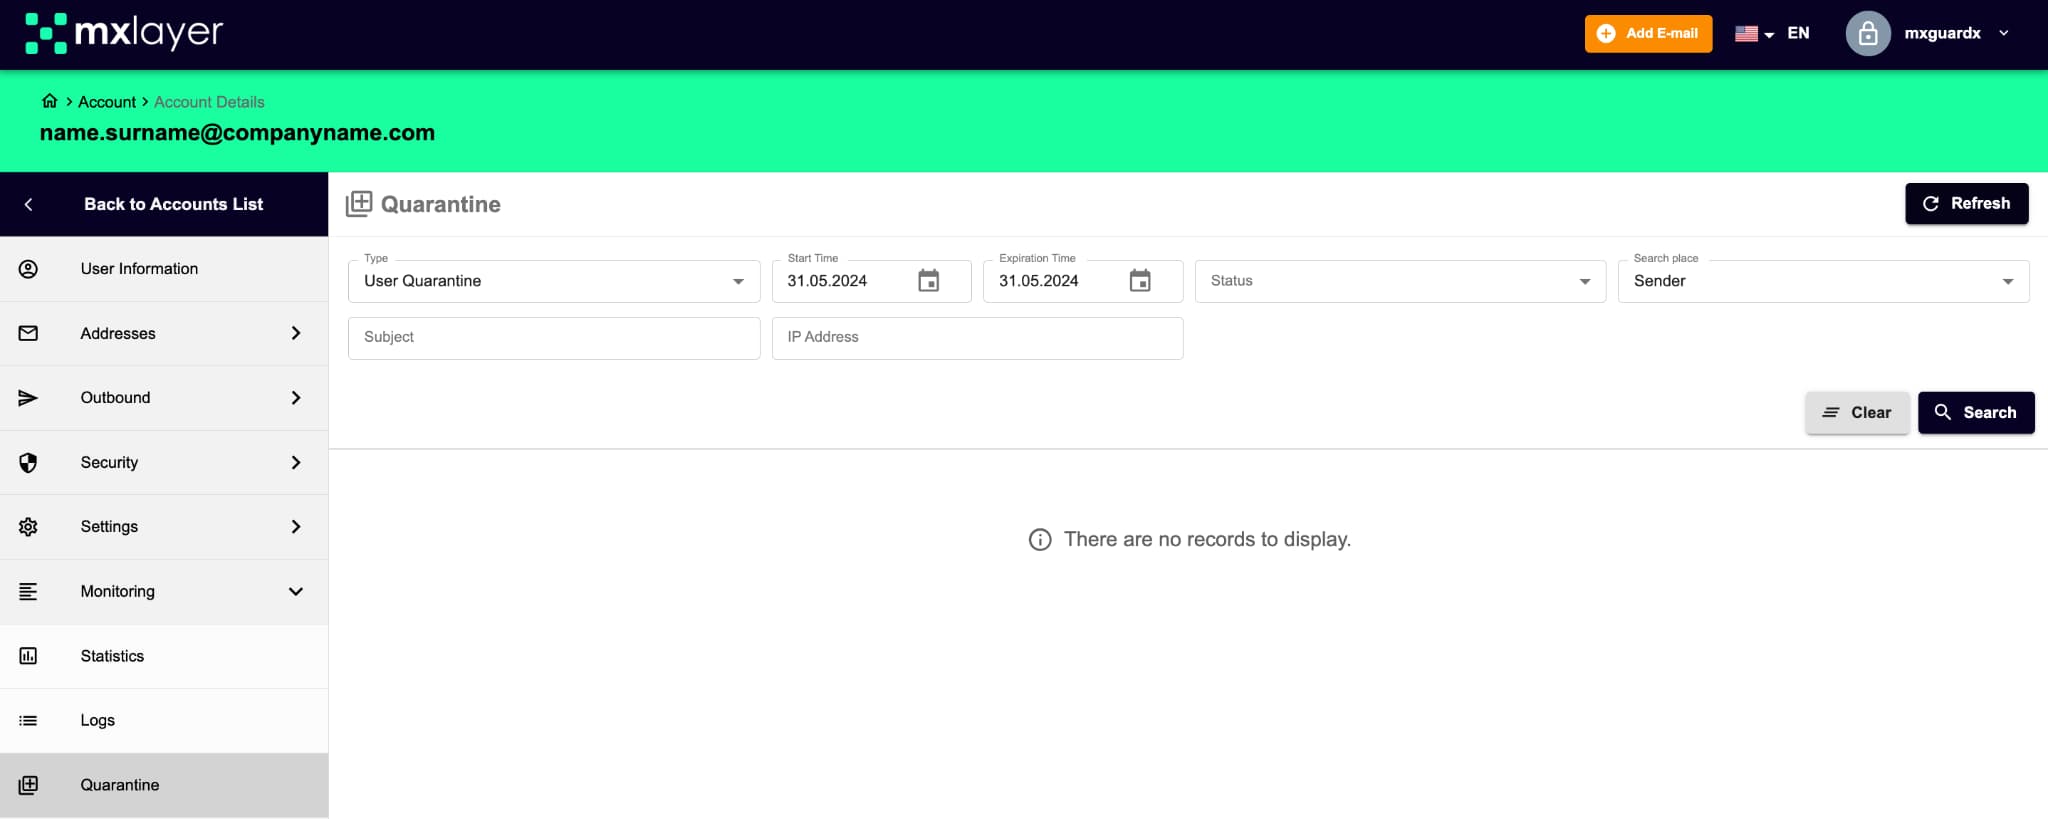
- From the Quarantine section, you can access your quarantined emails using any of the information from the Type, Start and End Date, Status, Sender, Recipient, Subject, and IP Address sections. In the search results, you can preview, release from quarantine, or delete the quarantined emails using the icons in the actions column. Additionally, you can perform a bulk download by selecting the appropriate format from Excel, PDF, and CSV.
